March 17, 2018
I always see my clients super excited about moving to WordPress. Even if they feel a bit scared at first, they always, always get that extra satisfaction about blogging once they re-launch their blogs on a new, professional platform.
You might also like:
- Benefits of Migrating to Self-Hosted WordPress.org.
- How to Move Your Blog From Wix to WordPress.org | Step By Step Tutorial.
- How to move your blog from WordPress.com to WordPress.org?
Blogger is an awesome platform for starting your first blog, but with time, you might start thinking that you need full control of your content in order to grow bigger. I realised that many of you might be thinking about transferring your blog to self-hosted WordPress, but not knowing how exactly it would work. By now, you probably already know that I offer Blogger To WordPress Migration Services for those wanting to leave all the work to a professional. However, if you’re a bit more adventurous and prefer doing things on your own, I prepared a step-by-step manual for you to follow. Not only it shows how you can move your blog’s content from Blogger to WordPress it also keeps your Google Rankings safe and keeps your blog active throughout the whole process.
 Alrighty, let’s get to work now!
1. CREATE YOUR WORDPRESS BLOG.
What you’ll have to do is actually create a new, self-hosted WordPress blog for yourself. Don’t worry, it’s super easy, just follow this 5-minute tutorial.
2. EXPORT YOUR CONTENT FROM BLOGGER
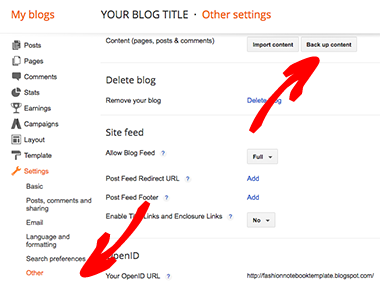
So, of course, you want to keep all those fabulous posts you wrote. Make sure to download them all in order to transfer your content to a new platform. For this, you’ll have to log-in to your Blogger’s dashboard and go to SETTINGS->OTHER and click on ‘Back Up Content’ button:
Clicking this button will bring up a popup tab where you need to click on the ‘Save to your computer’ button. It will be downloaded in .xml file to your computer. This file contains all your posts, comments & posts content.
3. IMPORT YOUR BLOG’S CONTENT TO WORDPRESS
As you have all your files ready now, login to your new WordPress blog. Usually, you will be able to access it through your web host or www.yourblogurl.com/wp-admin. Once you’re in, go to TOOLS->IMPORT and choose BLOGGER from the list. This will bring up a new window which will ask you to install a Blogger to WordPress importer, click on ‘install’. Once it’s done installing, make sure to click on ‘Activate the Plugin & Run the Importer’.
On the importer window, it’s going to ask you to upload your XML file there. Upload the file you previously downloaded from Blogger here.
You might be asked to assign your blogger posts to an existing author or create a new author account. It’s up to you to choose which way you want to go.
Now if your XML file is really large, you might run into an issue of loading it to your WordPress blog. If you used our 5-minute WordPress installation tutorial, make sure to get in touch with Bluehost team and ask them for assistance. They will take care of the upload for you in no time!
What if my images didn’t transfer well? You can use a plugin called Import external attachments. GO ahead, install and activate it. After activating the plugin, go to MEDIA->IMPORT ATTACHMENTS. The plugin will look for and import external images in your posts. All you need to do is click on Import Attachements button.
4. FIX PERMALINKS
Permalinks, in other words, stand for the URL structure. Since you’re uploading your blog from Blogger, you will want to set the same permalinks for your new blog too, so you don’t lose any of the readers coming from the links you’ve already shared.
To set permalinks right, you need to go to SETTINGS->PERMALINKS & choose Month and Name as your permalink structure.
5. REDIRECTION
You will have to set up a proper redirection if you want your readers to be taken to your new blog since now on. This will also notify search engines that your old blog is now moved to a new location. By setting up your redirection correctly, you will avoid any unnecessary downtime & won’t lose any ranking on Google.
The most simple way to do this is to install a Blogger to WordPress plugin on your new blog. The plugin will take care of everything on WordPress end, and you will only have to do 2 step adjustment on your blogger blog. So go ahead, install the plugin and make sure to follow all the steps in this tutorial. This is so important, yet it’s only going to take you a couple of minutes, I promise!
After you set up your redirection, I’d suggest you would go ahead & contact Bloglovin too. Just let them know that you just moved from WordPress to Blogger & ask them to check if they’re receiving updates on your new feed. Bloglovin might need to create a new account for you & transfer all the followers there, but there’s nothing to worry about. Bloglovin might need to create a new account for you & transfer all the followers there, but there’s nothing to worry about.

6. RSS REDIRECTION
If you have subscribers following your blog through RSS, you should also make sure to change your post feed redirect URL. For this, go into your Blogger’s account, then go to SETTINGS->OTHER and find Post Feed Redirect URL. Include your new feed url, usually, it’s something like: http://yourblogurl.com/feed (just make sure to change yourblogurl.com to your own url).
7. TAKE CARE OF YOUR NEW BLOG DESIGN
Now let the fun part begin! Go ahead and design your new blog! You can do so much on WordPress, use various plugins and choose from hundreds of themes. Unfortunately, you won’t be able to use the same theme you used on your Blogger site, but most of the designer offer matching WordPress alternatives. Take a look at my WordPress Themes to get yourself a new design. All of my themes come with free installation services too, so you leave all the hustle for us!
Hope you enjoyed this post, folks!
Let me know if this helped you to move to WordPress successfully, I’m also here to answer all of your questions, so feel free to get in touch if you need any tips or encouragement ;)

Moving your blog from Blogger to WordPress: Step by Step Manual
I am Kotryna Bass & I've tested most of the ways to make money online, so you wouldn't have to.
Back in 2012, I began my journey of selling digital products online. Since then, I have created several design and education brands using my personal websites and ETSY. I also started an e-commerce brand from scratch, reaching 500k in revenue. Through this experience, I learned all the tricks of marketing niche products online and making a profit without feeling overwhelmed. Let me show you what I've learned!
About Kotryna:
I am a digital products seller with over 10 years of experience! They have built multiple design and education brands, as well as a successful 7-figure e-commerce business from scratch. Get ready to learn from their wealth of knowledge in online marketing and profit-making.
LEARN MORE


Comments will load here